How to Use the Microsoft Outlook Calendar

There’s a whole lot you can do with Microsoft Outlook’s Calendar to help you stay organized and on top of your busy schedule!
With all the features and buttons it may seem overwhelming, so follow along with either our video or blog on how to use the Outlook Calendar efficiently to help you manage your schedule.
Below I will cover how to use the Outlook Calendar to:
Create appointments
Schedule meetings
View other’s schedules
Share calendars
And more!
Save yourself some scrolling by using our table of contents below to jump through the sections.
How To Use the Microsoft Outlook Calendar
You might also like this video playlist on the Outlook Calendar.
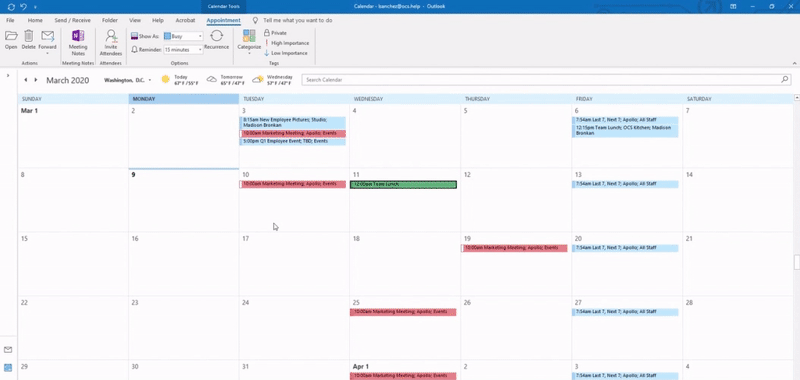
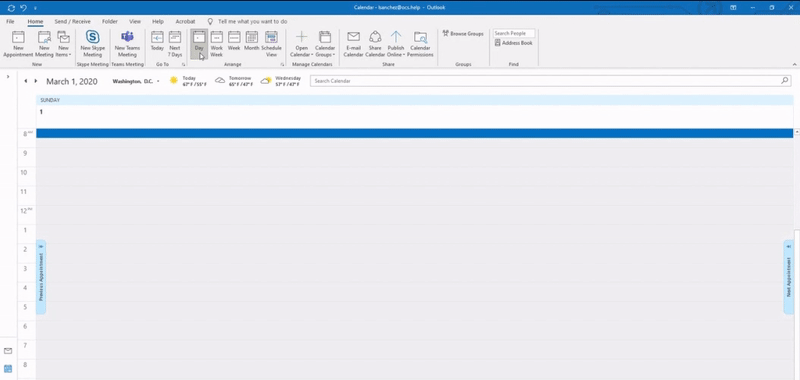
Calendar View
Outlook’s Calendar allows for customization of your calendar view.
You can look at your calendar by day, work week, week, month, or schedule view.
Adjust the calendar view:
In your calendar, choose from the following views:
Day
Work week
Week
Month
Schedule View
Get back to today
At any point, while viewing your calendar, save yourself time and select Today to go straight back to the current day.

View multiple calendars side-by-side
Select two or more calendars.
Select the arrow on one of the calendars to overlay the two (or more) calendars.
Select the arrow again to make them side-by-side.

Meetings and Appointments
Meeting and appointments are a great way to stay organized.
The main difference between the two is that an appointment only affects your calendar, whereas a meeting you can invite others.
For example, you would use an appointment to mark your calendar if you were out of the office for a doctor’s appointment.
You would create a meeting when you need multiple people to get together for a department meeting, team event, lunch, etc.
To schedule an appointment:
In Calendar, select ‘New Appointment.’
(If you want, select ‘Invite Attendees’ to add people and make your appointment a meeting.)
Otherwise, enter the Title of your appointment, Start and End time, Location, and add any notes if needed.
Select ‘Save & Close’ when you are finished.
This will show up on your calendar view.

Schedule a meeting:
In Calendar, select ‘New Meeting.’
Choose between ‘New Meeting’ or ‘New Meeting with All.’
Enter a Title, Start and End Time, Location, and add any notes or attachments.
In the ‘Required’ section enter the names of the attendees you would like to invite that are required to attend.
In the ‘Optional’ section enter the names of the attendees that are not required to attend.
Select the ‘Scheduling Assistant’ to check the availability for attendees.
You can also select ‘Make Recurring’ if this meeting will happen weekly, monthly, etc. on the same day and time.
Select ‘Send’ to send the meeting invitation
This will show up on your calendar view and on the calendar view of those who accept the invitation.

Calendar Sharing
Sharing calendars takes the back-and-forth out of scheduling meetings with others.
Having access to other employees’ calendars can show you when they are free or when they might not be.
Depending on the level of permission given to each employee, the calendar will show as ‘Busy’ or show specifically what that person is busy with.
Share your calendar:
Select ‘Calendar’, then ‘Share Calendar.’
Choose a calendar to share.
Select ‘Add,’ decide who to share your calendar with, and then select ‘Add.’
Select ‘OK’ and you’ll see the added people with a default permission level.
Choose a name, select the access level to give, and select ’OK.’

Open a shared calendar:
Open an email with a shared calendar and select Accept.
Select Calendar > Shared Calendars to view a shared calendar.
Choose a calendar to open.
Select View in Overlay Mode to layer the shared calendar over your own.

Search Your Calendar
Searching your calendar makes it easier to find items you are looking for.

To search:
Select ‘Calendar.’
In the Search box, type the keywords you want to search.
Use Quotation Marks for Exact Phrases:
In the Search box, type two or more search keywords in quotation marks (for example, “team review”).
The search results will only include items that have team review as a phrase and exclude items that only contain team or review.
Use And, Or, Not:
In the Search box, include AND, OR, or NOT between the keywords.
AND – searches for items with both keywords.
OR - searches for items with either keyword.
NOT - searches for items that have the first keyword, but not the second keyword.
Color Categories and Reminders
Color coding your calendar is a another tool to help you stay organized.
You create the labels for each color, so at a quick glance of your calendar you can see what you have going on.
Feel free to label by project, priority, task, department, process, etc.
Whatever it is just make sure it’s something that you’ll easily remember and recognize.
To add a color category:
Choose New Appointment or open an existing appointment by double-clicking on the event.
Choose Categorize and then one of the preset colors.
If this is the first time using the color, you’ll be asked if you want to rename it.
After you’ve chosen a category, a color bar will go across the top of the event.
If it’s a new appointment, add a Subject, Location, and brief description.
Choose Save & Close to finish.

Add or update reminders:
Choose New Appointment or open an appointment by double-clicking on the event.
Note: If it’s a recurring event, you can change the reminder for a single event or the entire series.
Choose the Reminder drop-down menu and choose how long before the appointment you want to be reminded.
Or choose None if you don’t want a reminder.
If it’s a new appointment, add a Subject, Location, and brief description.
Choose Save & Close to finish.